1. Overview
In this article, we’ll focus on using Mustache templates for producing HTML content in Spring Boot applications. It’s a logic-less template engine for creating dynamic content, which is popular due to its simplicity.
2. Maven Dependency
To be able to use Mustache along with Spring Boot, we need to add the dedicated Spring Boot starter to our pom.xml:
<dependency>
    <groupId>org.springframework.boot</groupId>
    <artifactId>spring-boot-starter-mustache</artifactId>
</dependency>
<dependency>
    <groupId>org.springframework.boot</groupId>
    <artifactId>spring-boot-starter-web</artifactId>
</dependency>
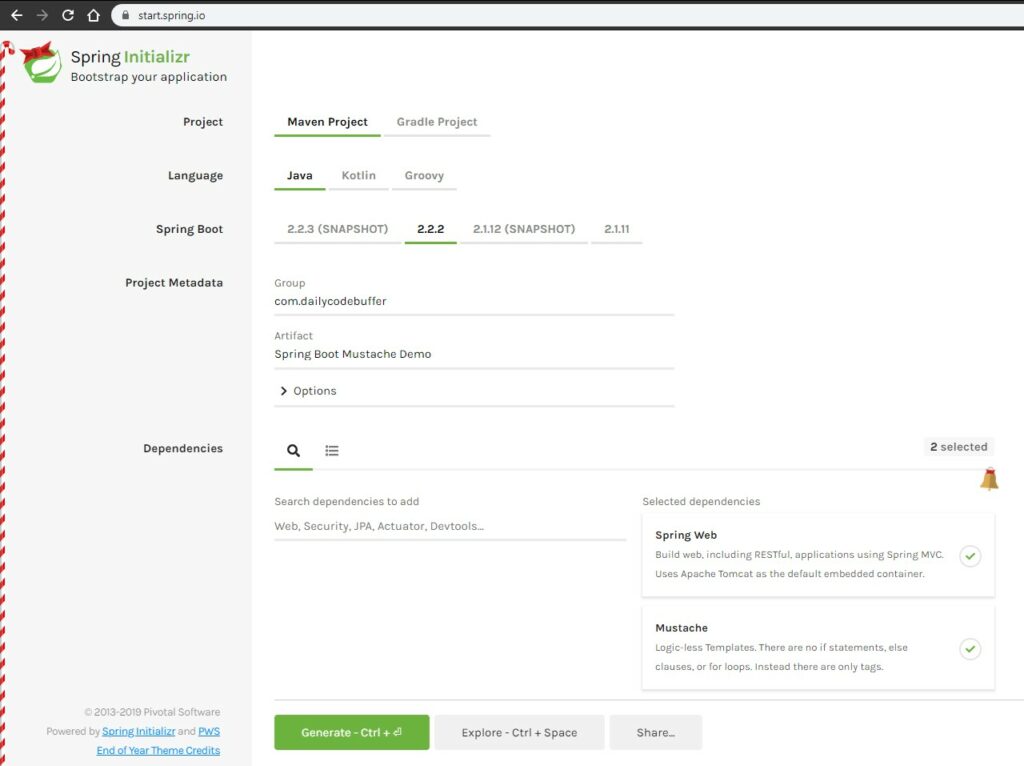
In addition, we need the spring-boot-starter-web dependency.
Below is the Spring Initializr for generating the project.

3. Project Layout
This is how the project layout will look like for the Spring Boot Mustache application.

4. Creating Templates
Let’s create a simple HTML template using Mustache which we will use in our sample Spring Boot web application. We are using a modular approach to build our Spring Boot web application. The main template for this post is split into the following three parts.
4.1 Header (header.mustache)
Header parts contain the head and starting body for the HTML template.
<!DOCTYPE html>
<html lang="en">
<head>
    <meta charset="UTF-8">
    <title>Sample Spring Boot application with Mustache</title>
</head>
<body>
4.2 Footer (footer.mustache)
</body>
</html>
4.3 Main Template (book.mustache)
We will be adding the header and footer templates in this main template
{{>header}}
<h1>Mustache with Spring Boot</h1>
<div> <b>Book List </b></div>
{{#bookList}}
    <b> Book ID: </b>{{bookid}}
    <b> ISBN Number: </b>{{isbn}}
    <b> Book Title: </b>{{bookTitle}}
    <b> Author: </b>{{author}}
    <b> Price: </b>{{price}}
    <br>
    <hr>
{{/bookList}}
{{>footer}}
5. Spring Auto Configuration
We will add the Spring auto-configuration properties for mustache templates in the application.properties file.
spring.mustache.prefix = classpath:/templates/
spring.mustache.suffix = .mustache
Note that the default mustache template file extension is now .mustache. We can override this configuration with a property:
spring.mustache.suffix:.html
6. Controller
We have a simple controller, our controller returns a list of Books.
@Controller
public class BookController {

    @GetMapping("/books")
    public String getProducts(final Model model){

        List bookList = IntStream.range(0,7)
                        .mapToObj(i->getBook(i))
                        .collect(Collectors.toList());

        model.addAttribute("bookList",bookList);
        return "book";
    }

    private Book getBook(int i){
        return new Book(Long.valueOf(i),
                "ISBN Number -" + i,
                "Book Name " + i,
                "Author " + i,
                Double.valueOf(100 * i));
    }
}
Our controller creating a dummy list of Books and set this book list in the Model class to be available during HTML rendering. Pay close attention to the {{#bookList}} and {{/bookList}} tags in our HTML, these tags iterate over the list of books filled in the controller and render each element of the list on the UI.
7. Run the Application
We can also test the application by deploying it with:
mvn spring-boot:run
Once deployed, we can hit localhost:8080/books, and we’ll get our result:

7.1 Code Flow

8. Handling Default values
In a Mustache environment, if we do not provide a value for a placeholder, the MustacheException will be thrown with a message “No method or field with name ”variable-name …”.
In order to avoid such errors it’s better to provide a default global value to all placeholders:
@SpringBootApplication
public class SpringBootMustacheDemoApplication {

	public static void main(String[] args) {
		SpringApplication.run(SpringBootMustacheDemoApplication.class, args);
	}

	@Bean
	public Mustache.Compiler mustacheCompiler(
			Mustache.TemplateLoader templateLoader,
			Environment environment) {

		MustacheEnvironmentCollector collector
				= new MustacheEnvironmentCollector();
		collector.setEnvironment(environment);

		return Mustache.compiler()
				.defaultValue("Some Default Value")
				.withLoader(templateLoader)
				.withCollector(collector);
	}
}
Now, if we change any variable name and we forget to change the same in HTML or Model (vice-versa), it won’t throw the Mustache compiler exception. But for that variable, the default value will be populated and the UI will be rendered.

The price variable is changed with the default values from the Mustache compiler.
9. Mustache with Spring MVC
In case you can not use Spring Boot for your web application, integrating Mustache with your Spring MVC application is not complex. Let’s walk through the steps of integrating Mustache with your Spring MVC application.
9.1 Maven Dependencies
Spring Boot automatically takes care of adding required dependencies, For the non Spring Boot application, add Mustache maven dependencies.
<!-- https://mvnrepository.com/artifact/com.github.sps.mustache/mustache-spring-view -->
<dependency>
    <groupId>com.github.sps.mustache</groupId>
    <artifactId>mustache-spring-view</artifactId>
    <version>1.4</version>
</dependency>
In order for our Spring MVC application to work properly, we need to configure view resolver to use Mustache as a template engine.
@Bean
public ViewResolver getViewResolver(ResourceLoader resourceLoader) {
    MustacheViewResolver mustacheViewResolver
      = new MustacheViewResolver();
    mustacheViewResolver.setPrefix("/WEB-INF/views/");
    mustacheViewResolver.setSuffix("..mustache");
    mustacheViewResolver.setCache(false);
    MustacheTemplateLoader mustacheTemplateLoader
      = new MustacheTemplateLoader();
    mustacheTemplateLoader.setResourceLoader(resourceLoader);
    mustacheViewResolver.setTemplateLoader(mustacheTemplateLoader);
    return mustacheViewResolver;
}
We just need to configure the suffix, where our templates are stored, prefix the extension of our templates, and the templateLoader, which will be responsible for loading templates.
10. Conclusion
In this post, we learned how to implement Mustache with Spring Boot application. Mustache is really a powerful yet simple template engine. At the end of this post, we covered the steps for integrating Mustache in non Spring Boot application.
Source Code
As always the source code is available over on GitHub.


